How To Unlock The Bootloader On Any HTC Smartphone [How-To]

After locking down the bootloader of its devices in 2011, HTC faced strong community backlash. This led to the company to release a web-based bootloader unlocking tool in an effort to appease users. Since then, the bootloader of any Android device from HTC (except for some of the carrier variants sold in the United States) can be completely unlocked in just a few simple steps.
It is not possible to gain root access on any of the HTC’s Android device without unlocking the bootloader first. While the process might be an added inconvenience for some, the whole process is pretty trivial and does not require more than 5 minutes. Here’s how to do it.
Before you proceed further, keep in mind that unlocking the bootloader will format the internal memory of your HTC device, so it is highly recommended that you make a backup of your personal data — including photos, videos and contacts — before we begin.
Also, keep In mind that unlocking the bootloader of your HTC device will void its warranty. HTC is not really strict in enforcing this rule, so you might just get lucky if you ever need to send your device for repair while in warranty. But technically, your warranty will be void, so you won’t be entitled to free repairs.
If you’re happy to continue, let’s go.
1. First, make sure that you have all the necessary drivers installed. This is only needed if you are running Windows. You can either install the HTC Sync application, which in turn will automatically install the required drivers, or you can download and install only the required drivers from here.
Keep in mind that you will need to download and install both the .exe files (Sync and Driver). They should work just fine on Windows 7 and Windows 8.
Mac or Linux users don’t need to install any kind of drivers.
2. Now, you will need to get your hands on the required ADB/Fastboot files. Here is a small ZIP file that contains all the required files for all the three platforms, so that you don’t need to download the whole SDK.
- Windows – Download link
- Mac – Download link
- Linux – Download link
3. Extract the files of the ZIP file inside a new folder named android on your desktop.
If you are using Windows, use the Command prompt to navigate to this folder.
Go to Run, type cmd and press the Enter key. From the Command prompt window that opens up, enter the following command -:
cd desktop/android
You need to enter the same command on Mac or Linux inside a new Terminal window.
This command should take you to the Android folder on your desktop that you created in Step 2. If you get an error saying the folder or directory does not exist, you will first need to navigate to your user folder.
Usually, you can do this by entering the following command -:
cd username [You are supposed to enter your computer’s username here]
If the following command works, enter the first command again to navigate to the Android folder on your desktop.
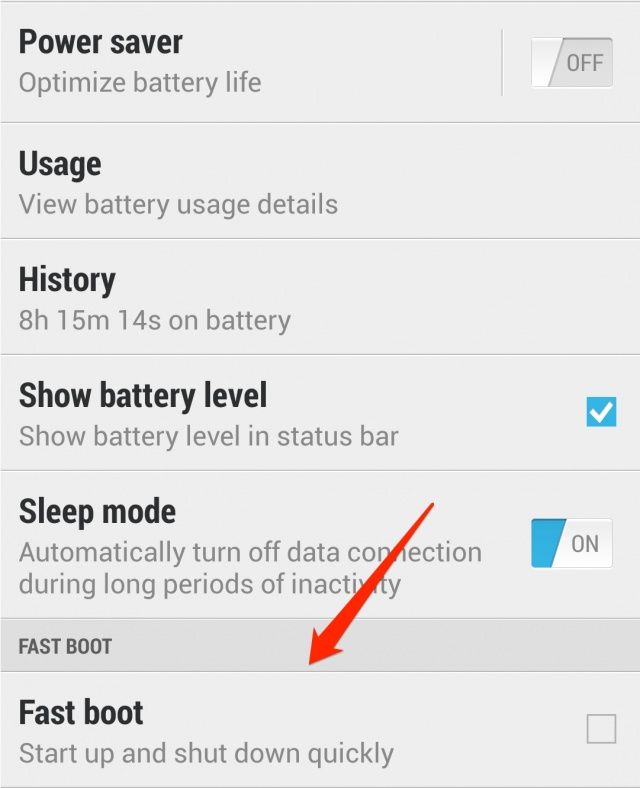
4. Before you proceed further, you will need to put your HTC device in boot loader mode. First, makes sure that you have disabled the Fast boot mode that HTC introduced on its devices since 2011. Head over to Settings -> Power and then de-select the Fast boot option.
Now, switch off your device. After a few seconds, press the Volume down and Power button simultaneously to boot your HTC device into HBOOT mode.
Using the volume keys, navigate to the fastboot option and select it using the Power button.
5. Connect your HTC device to your PC. Now, on the command prompt or Terminal window that you had opened previously, type in the following command.
On Windows
fastboot devices
On Mac/Linux
./fastboot devices
The command you need to enter in Windows or Mac/Linux are the same. Only that you will need to prefix a “./” before every command on Mac and Linux. Do not forget this in the upcoming steps, otherwise you will get an error.
At this point, if you have followed all the steps properly, you should get an output similar to this.
![]()
6. Now, you will need to head over to the HTC’s Developer website to get your identifier token before you can unlock the bootloader. If you have not already, create an account there, and then select the Unlock Bootloader option.
7. Select your device from the drop-down menu on the website. If your device is not listed there, you need to select the All other supported models option. This includes even the much more recent devices from HTC like the One.
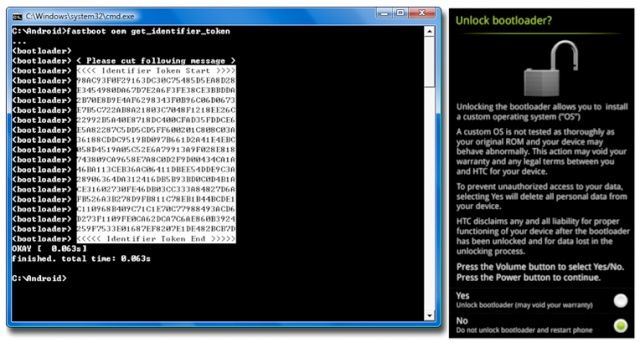
8. Accept all the warning and agreements, and keep proceeding forward by clicking the next button. When you reach Step 8, enter the following command in Command prompt or Terminal -:
fastboot oem get_identifier_token
Copy the output you see in Terminal or Command Prompt to a new notepad file.
You only need to keep the random series of numbers and alphabets from the output that you just copied. Remove everything else such as <<<, (bootloader), Info, or any other piece of text. Do not edit the the Identifier token Start or End line though.
Paste the edited output inside the My Device Identifier Token box on the HTC’s Developer website, and press the Submit button.
Within a few seconds, you will get an email from HTC containing an unlock_code.bin file that is specific to your phone. Download and transfer this file to the Android folder on your Desktop.
9. Now, enter the following command in Terminal or Command Prompt
fastboot flash unlocktoken Unlock_code.bin
10. After entering this command, a screen will come up on the screen of your HTC asking you whether you really want to unlock the bootloader or not. Use the Volume key to highlight the Yes option, and select it using the Power button.
At this point, your phone’s bootloader will be unlocked and it will restart automatically. The first boot might take some time though so be patient. You can now proceed to root your device, or directly flash a custom ROM. If you are looking to root your HTC One, you can follow our guide here.

