How to root the OnePlus One
Minus the hype and availability issue, the OnePlus One is an excellent phone that offers a stellar value for money. The device has been clearly marketed towards enthusiasts, especially with the international version running CyanogenMod right out of the box. This also makes gaining root access on the One an extremely easy process.
In fact, the steps are exactly the same as you would have to follow while rooting a Nexus device. Unlike other OEMs, OnePlus will also not void the warranty of the device if you end up unlocking its bootloader or rooting it. However, if you somehow manage to brick the phone during the process — chances of which happening are almost nil — you’ll have to shell out money from your pocket to get it fixed.
So, without further ado, follow the steps below to root your OnePlus One.
Make a backup
Rooting the OnePlus One will require users to unlock the bootloader of their device, which in turn will wipe the handset clean of all the data including your photos, videos, music and other files. Therefore, it is highly recommended that users first create a backup of all their personal data before proceeding with the steps mentioned below.
Download the required files
Step 1: Download all the required files from below and extract the contents of the ADB/Fastboot ZIP file inside a folder called “oneplus” on your desktop. Also, rename the TWRP recovery image to recovery.img and transfer it to the same “oneplus” folder.
Step 2: Open a new command prompt or terminal window and navigate to the folder created above using the ‘cd’ commands.
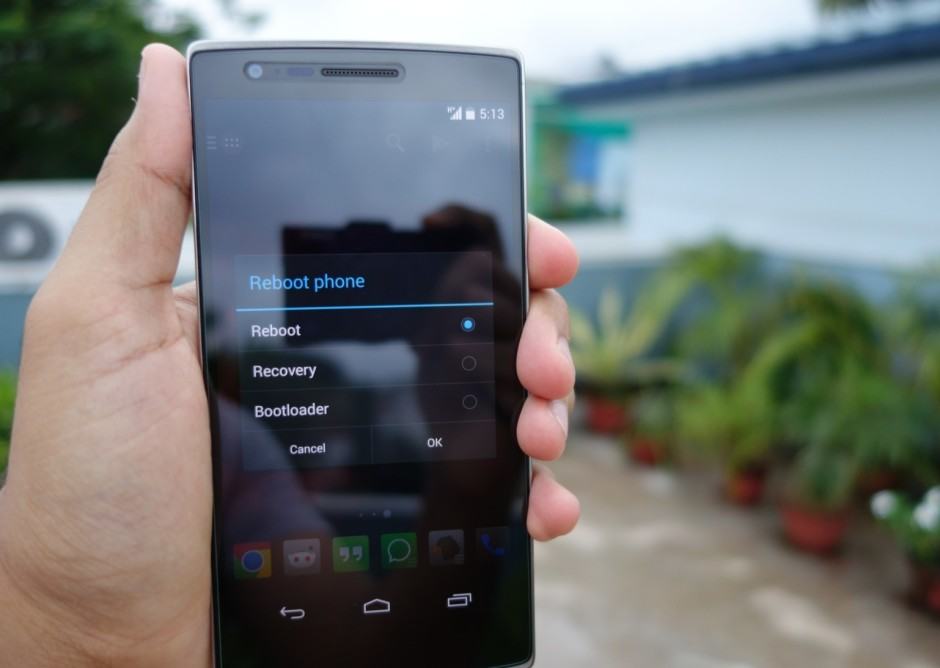
Step 3: Before you reboot your OnePlus One into Fastboot mode, you will need to activate the Advanced Power menu option. To do this, head over to Settings -> About Phone and tap on Build Number seven times to enable Developer Options.
Then, head back to Settings -> Developer Options and enable the Advanced Reboot option. Now, long press the Power button, select Reboot followed by Bootloader to boot your One into Fastboot mode.
Step 4: Connect the device to your PC and enter the command below to make sure that it being properly detected.
fastboot devices
Mac owners, you will need to prefix a “./” before every fastboot or ADB command you issue.
If detected, enter the command mentioned below to unlock the bootloader of your OnePlus One.
fastboot oem unlock
Step 5: The bootloader of your device will be unlocked and it should automatically reboot into Android OS. You will have to enter your Google credentials and setup the device from scratch again. Once done, transfer the SuperSU ZIP file to the internal memory of your OnePlus One.

Flashing TWRP
Step 5: Reboot the handset into fastboot/bootloader mode by following Step 3 above. Then, connect the device to your PC to install a custom recovery.
Step 6: Flash the custom recovery you downloaded in step 1 by using the command below.
fastboot flash recovery recovery.img
Installing SuperSU
Step 7: Once you have flashed the custom recovery, reboot your OnePlus One into Android. Then, use the Advanced Power menu to reboot the it into Bootloader mode.
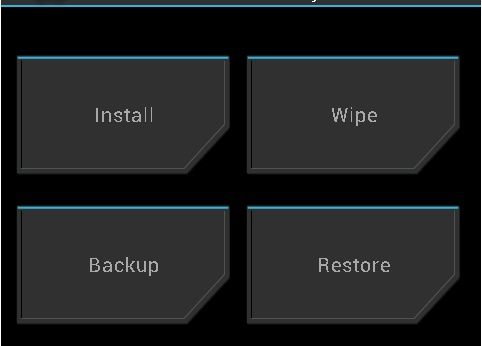
Step 8: Once you have booted into recovery, tap on Install and then select the SuperSU ZIP file, which you had transferred to the device in Step 5.
Once the ZIP file has been installed, reboot your One to enjoy root access on it.
You will still be able to receive direct OTA updates from CyanogenMod down the line, but only if you don’t modify the system partition in any way. Also, to make sure that future OTA updates from CyanogenMod don’t overwrite your custom recovery, head over to Setting -> Developer Options and disable the Update CM Recovery option.

