Manually Pull The Android 4.3 Jelly Bean OTA Update [How-To]
Earlier today, Google unveiled Android 4.3 Jelly Bean along with the new Nexus 7. The company also announced that it has started rolling out the Android 4.3 OTA update for the existing Nexus devices, including the Nexus 4, Nexus 10, Galaxy Nexus and the 2012 Nexus 7.
If you own a device that is getting the Android 4.3 Jelly Bean update from Google, and cannot wait for the OTA update to land, here is a simple trick to try and manually pull the update from Google’s server.
Before you proceed to follow the steps below, keep in mind that they are only applicable if you are running stock Android, without root access or any custom recovery installed. Since the OTA updates are staged roll-outs, it is not necessary that the steps below would work. However, if the OTA update file is already present in the nearest Google server located to you, your phone can very well manually fetch the update and install it.
1. Head over to Settings -> Apps on your Nexus device, and swipe to the All apps tab.
2. Now, you will need to find the ‘Google Services Framework’ system app from the list of apps installed on your device.
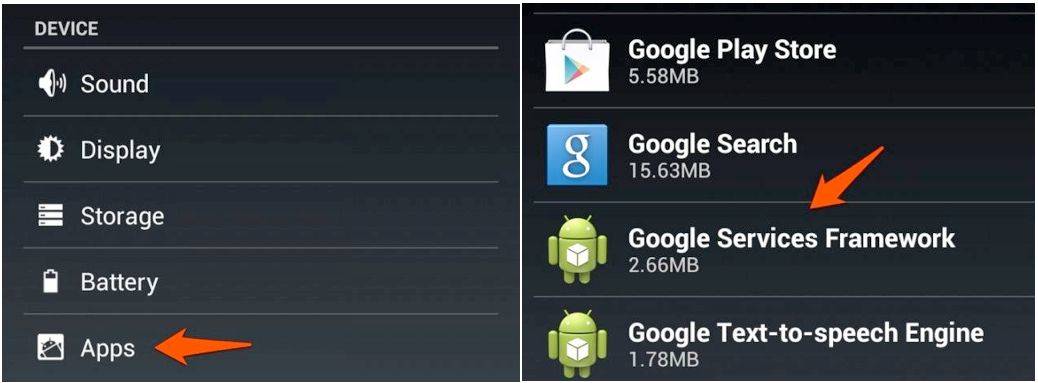
3. Then, proceed to tap the Force Stop option, followed by Clear Data.
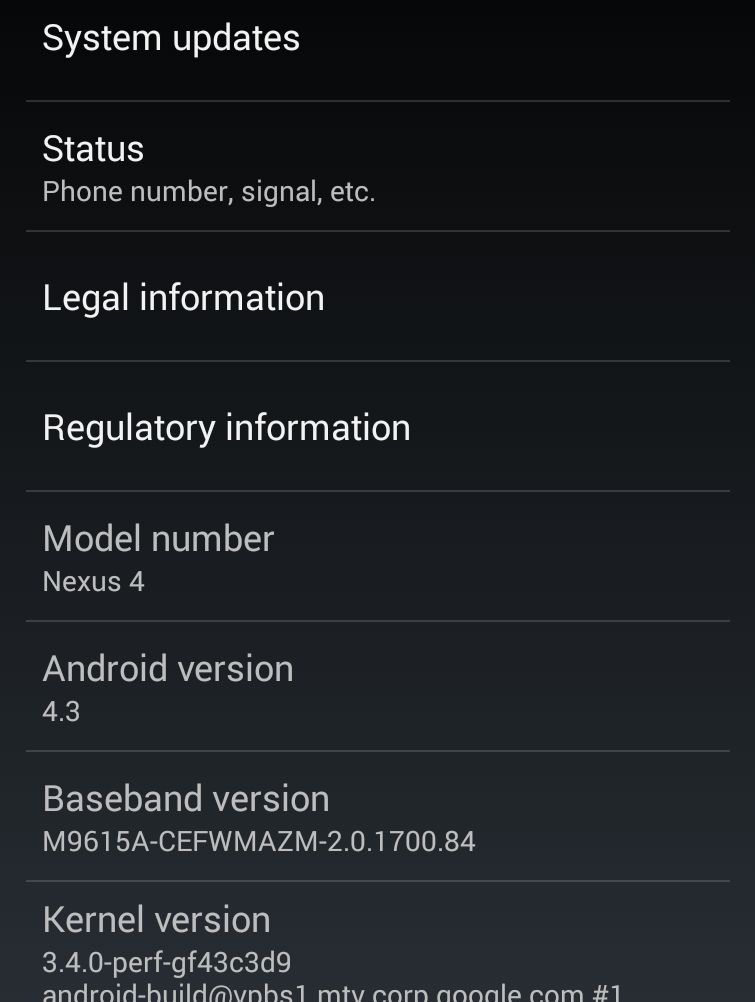
4. Restart your Nexus, and after a couple of minutes head over to Settings -> About Phone -> System Updates. Now, tap the Refresh button and hope that the OTA update file is already present on the server your phone is connecting to.
If all goes well, your Nexus device from Google must be downloading the OTA update to Android 4.3 Jelly Bean. If not, well, you can try to repeat the above steps a few times. If that fails as well, you should try the above steps after a couple of days.
Keep in mind that the above steps won’t work for the 3G variant of the Nexus 7 (2012) and the CDMA variant of the Galaxy Nexus, since Google has not started rolling out the OTA update to these devices.
Update: If you are unable to download apps from the Play Store after this, remove and re-add your Google account to fix this issue.

