Rooting The International Galaxy S III The Right Way [How-To]

Rooting an Android device has many advantages, including the ability to remove some of the pre-installed bloatware, add new features, and do much more. Samsung has been pretty liberal about the whole root thing, which makes its devices some of the easiest to root — after the Nexus series from Google.
Here is a detailed step-by-step guide on how to root the international Galaxy S III (I9300) from using a Windows-based PC.
1. For this rooting guide, we will be using an application known as ODIN (v3.07), which can be downloaded from here.
2. Before you proceed further, you will need to make sure that all the proper drivers are already installed on your Windows PC. If you use KIES on your PC to sync your Galaxy S III, then you already have the required drivers installed. If not, download and install KIES from here. The drivers will work on Windows 7 as well as on Windows 8.
3. Download the CF-Auto-Root kernel by Chainfire from here. As of now, this kernel will work on all the various firmware for the Galaxy S III, including the ones based on Android 4.1.2 and 4.2.1. You can always find the latest CF-Auto-Root kernel from here.
Extract the content of the CF kernel on your desktop. The final extracted file on your desktop should only be a single .tar file, and not two files named recovery and cache.
4. Start ODIN, press the PDA button select the .tar file that you extracted in the previous step on your desktop. Do not change any other setting in ODIN.
5. Switch off your Galaxy S III (I9300) and re-insert the battery. Now, press the Volume Down + Home + Power buttons simultaneously to make your Galaxy S III boot into download mode. You will get a warning on your phone that flashing a custom OS can cause issues — just press the Volume Up button to skip the warning.

6. Connect your Galaxy S III to your PC now. Windows will take a minute to install all the required drivers, at the end of which ODIN will automatically detect your Galaxy S III and show a random COM:ID inside a blue glowing rectangle.
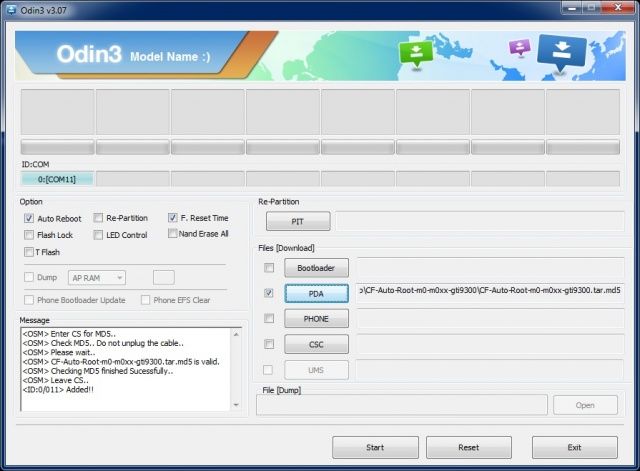
7. Press the Start button and wait for ODIN to flash CF-Auto-Root on your device. Once ODIN has flashed CF-Auto-Root, your Galaxy S III will boot into a custom recovery for a brief time and automatically install SuperSU, among other things. When everything is done, your phone will automatically reboot into Android OS with root functionality.
If for some reason, your phone boots up without root access, you can try to manually installing SuperSU from the Play Store. However, if your Galaxy S III did not boot into the custom recovery for a brief time after ODIN was done flashing CF-Auto-Root, you will need to repeat the whole process.
Do drop in a comment if you need some help rooting your Galaxy S III and we will be more than glad to help!

