Use The Native Screen Recording Function In Android 4.4 KitKat [How-To]

Google added the ability to take screenshots in Android with Ice Cream Sandwich back in 2011. However, recording on-screen content natively was not possible and even many rooted apps failed to work properly, even though they promised otherwise.
Thankfully, with Android 4.4 KitKat, Google has added the ability to natively record on-screen content without any kind of hackery.
There is a catch, though: The device must be connected to a PC and the screen recording command must be issued using an ADB command shell. While recording using third party apps from the Play Store is possible, you will need to make sure that the device is rooted.
For Rooted Devices
Recording the on-screen content on an Android device is a fairly easy process, provided you have root access. Simply head over to the Play Store and download Rec.
![]()
Make sure to set the recording duration, bit rate and whether you want to capture any audio from the microphone or not before tapping the Record button. All the recorded videos are stored in the /sdcard/rec folder.
For Non-Rooted Devices
The process to record the on-screen content is slightly more tedious for non-rooted devices running KitKat. The first thing that you need to make sure is that you have access to a PC with ADB/Fastboot setup.
1. Download this ZIP file containing ADB/Fastboot files and extract its content inside a new folder called “android” on your desktop.
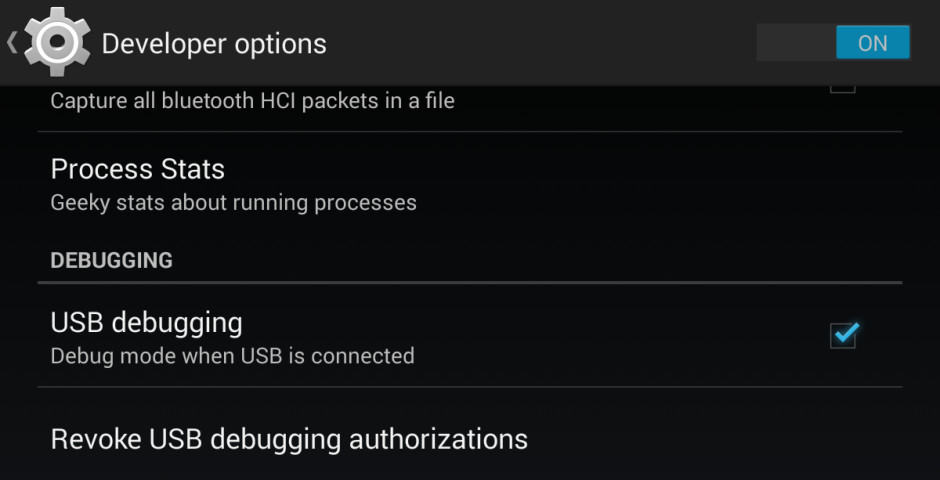
2. On your Android device, you will need to enable USB Debugging. You can do this by first going into Settings -> About Phone and tapping on “Build Number” seven times to enable Developer options. Then, go back to Settings -> Developer Options and enable USB Debugging.
3. Plug in your Android device to your PC and open a new terminal or command prompt window. Then, navigate to the “android” folder you created in the previous step.
4. Make sure that your device is detected in ADB by using the command below:
For Windows users:
adb devices
For Mac users:
./adb devices
![]()
5. Now, to record the content on your screen, use the following command:
adb shell screenrecord /sdcard/FILENAME.mp4
Mac owners, make sure to prefix a “./” before adb otherwise you will get an error. By default, the maximum video length is 3 minutes. If you want to stop recording within that time, simply press Ctrl + C.
You can also specify the video bitrate and its length by using the following command:
adb shell screenrecord –bit-rate 8000000 –time-limit 30 /sdcard/filename.mp4
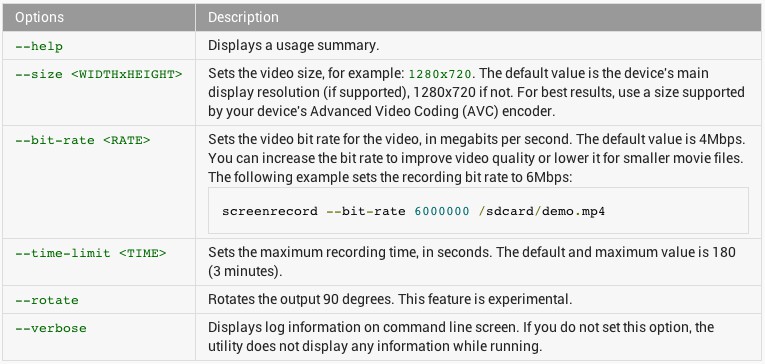
All the recorded videos will be stored in the root of your internal storage, which you can then copy-paste to your PC. Check the image above for the full list of commands that you can use to tweak certain parameters while recording videos.

